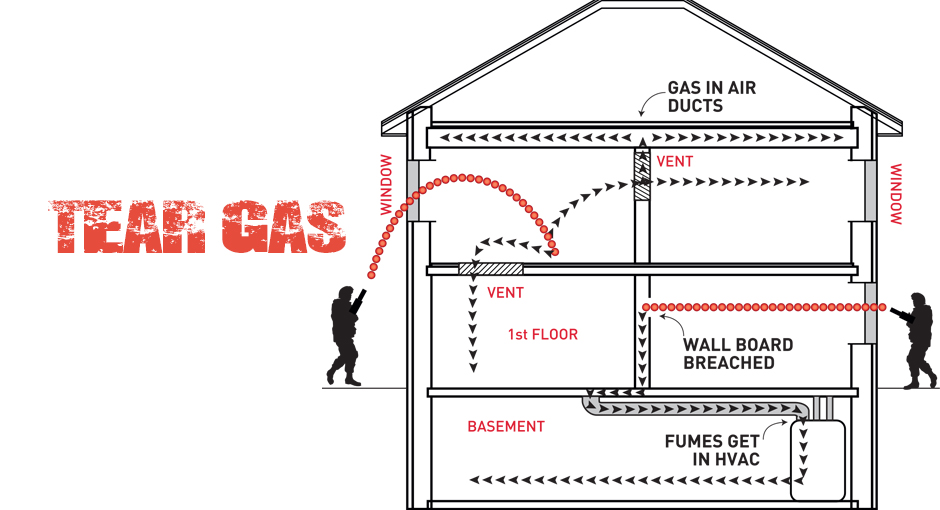
Overcoming the Challenge of Removing Tear Gas Residue

Eliminating tear gas residue tops the list of structural maintenance nightmares. It was designed to disable a human being and poses a great challenge for any crew tasked with tear gas clean up from any structure. Even pepper spray in a home can impact its livability.
There is no such thing as an easy tear gas remediation job, but Aftermath Inc. knows executing this job successfully is essential because the disturbing effects of the gas can linger and make the area uninhabitable.
Assess the Situation
Every situation is different and requires a different strategy for a tear gas cleanup. Following these steps can help crews develop the right plan of action.
- Before entering the affected area, determine how much and what type of tear gas was used. There are a number of different types of tear gas and some are highly flammable, which would alter the cleaning method. For example, do not use any cleaning method involving heat when the tear gas is flammable.
- After dressing in U.S. Occupational Safety and Health Administration (OSHA)-approved encapsulated suits and respirators, make sure the HVAC system is either turned off or at least significantly reduced.
- Photographs should be taken of any biological material that could create a biohazard, the amount of tear gas residue, any punctured drywall or any dyes incorporated into the gas.
Create an Action Plan
After the situation has been evaluated it’s time to determine what action planned will be executed. Make sure to discuss the options available with the property owner or facility manager, including identifying property that may not be salvageable.
Before starting the cleaning process:
- Create a staging area where non-porous items can be stored and cleaned.
- Seal off each room and hallway with plastic sheeting, starting with the uppermost rooms.
- Keep cleaned rooms from being re-contaminated by covering air vents.
- Work in areas no larger than 15-by-15 feet by sealing off larger rooms by half or quadrants to minimize cross-contamination.
Start the Cleaning Process
Tear gas remediation, like any biohazard cleaning, takes meticulous planning and care. It’s important to be extremely thorough with each step to make sure all residue has been removed.
Remove and dispose of all porous materials, including carpeting, padding, cloth furniture, draperies, electronic equipment and other materials into which tear gas residue can penetrate.
The workflow for the cleaning process should start on the top floor because tear gas settles downward. It’s also important to use only one exit to prevent crew members from re-contaminating already cleaned areas.
And once a room is cleaned, make sure it’s sealed off with a new plastic sheet and marked to prevent any workers from entering, and possibly contaminating, the area.
To start the cleaning process:
- Move all non-porous items to the staging area.
- If the drywall was punctured, remove and dispose of both layers of drywall as well as insulation.
- Remove as much residue as possible by vacuuming all surfaces with a HEPA vacuum.
- Use a specially formulated cleaning agent to spray the area, helping to keep residue particles from becoming airborne.
- Manually wipe down all surfaces, including porous surfaces such as flat painted walls or exposed wall studs.
To be sure all residue has been removed, repeat the vacuuming, spraying and wiping steps at least three times.
On the walls that were punctured, wood studs should be encapsulated with a wood sealant to keep the studs from re-releasing any tear gas residue after the area has been cleaned.
Finish the Job
After the cleaning process is complete, use a number of different crew members to enter each room to check if there are any effects from tear gas residue. Unfortunately, there isn’t a meter or test to determine if any residue still exists.
It’s extremely important to have a certified HVAC crew come in to clean and inspect the air ducts. Tear gas residue can be left in air ducts and, when turned back on, contaminate the entire building.
A tear gas remediation can take anywhere from four days to two weeks. The biggest challenge is controlling cross-contamination, but every situation and structure is different. The entire process can be very difficult and time consuming, but being meticulous is the only way to completely remediate tear gas residue.
 877-872-4339
  Contact Us


